 Save to Pinterest
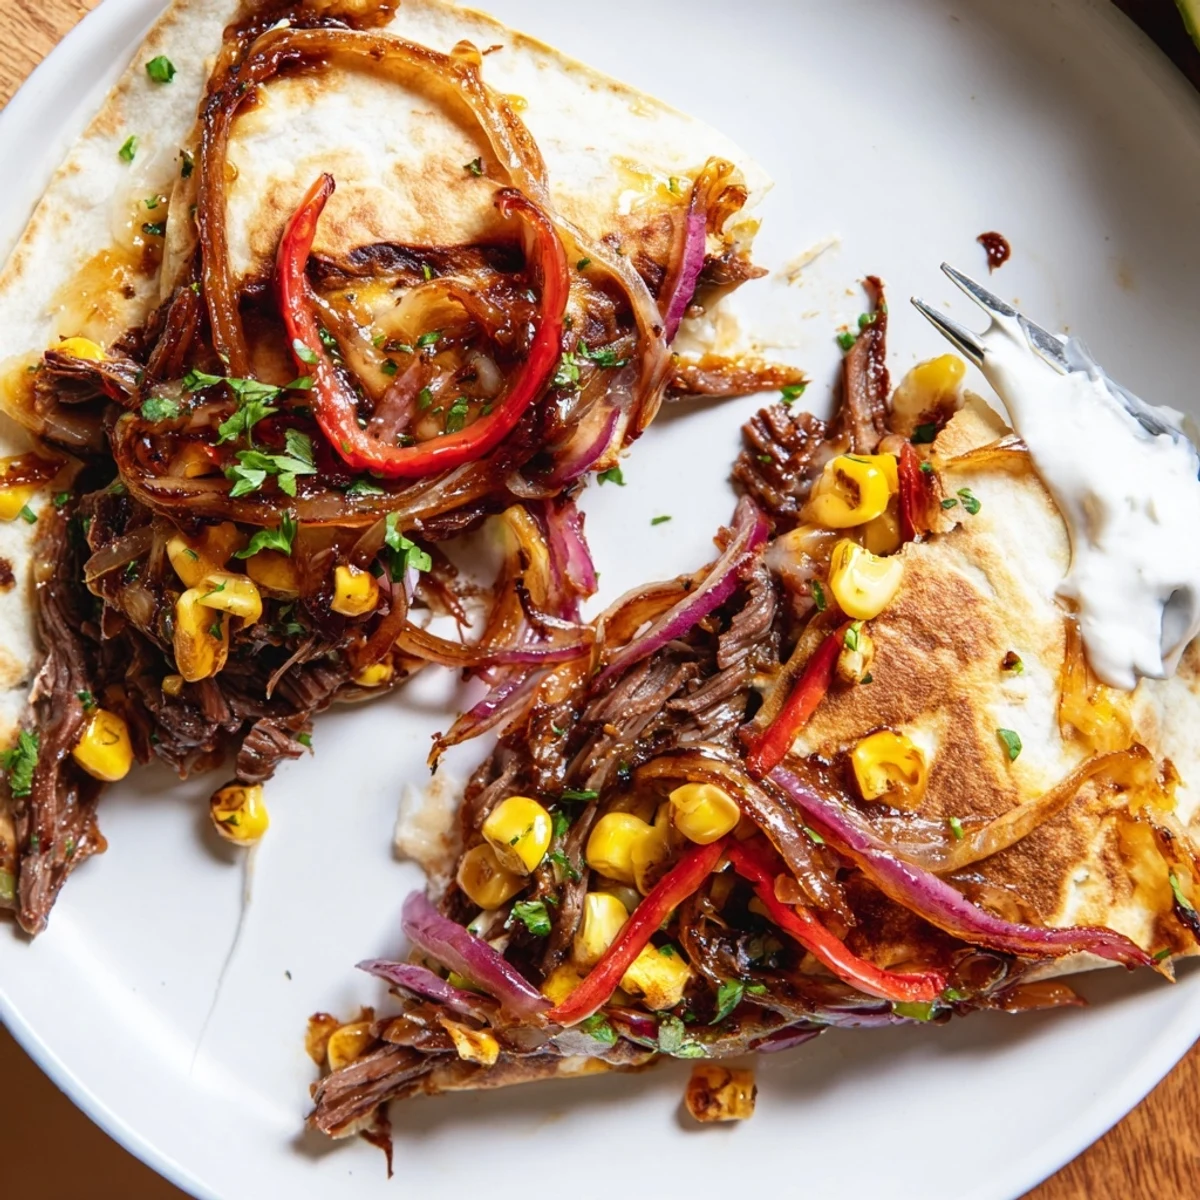
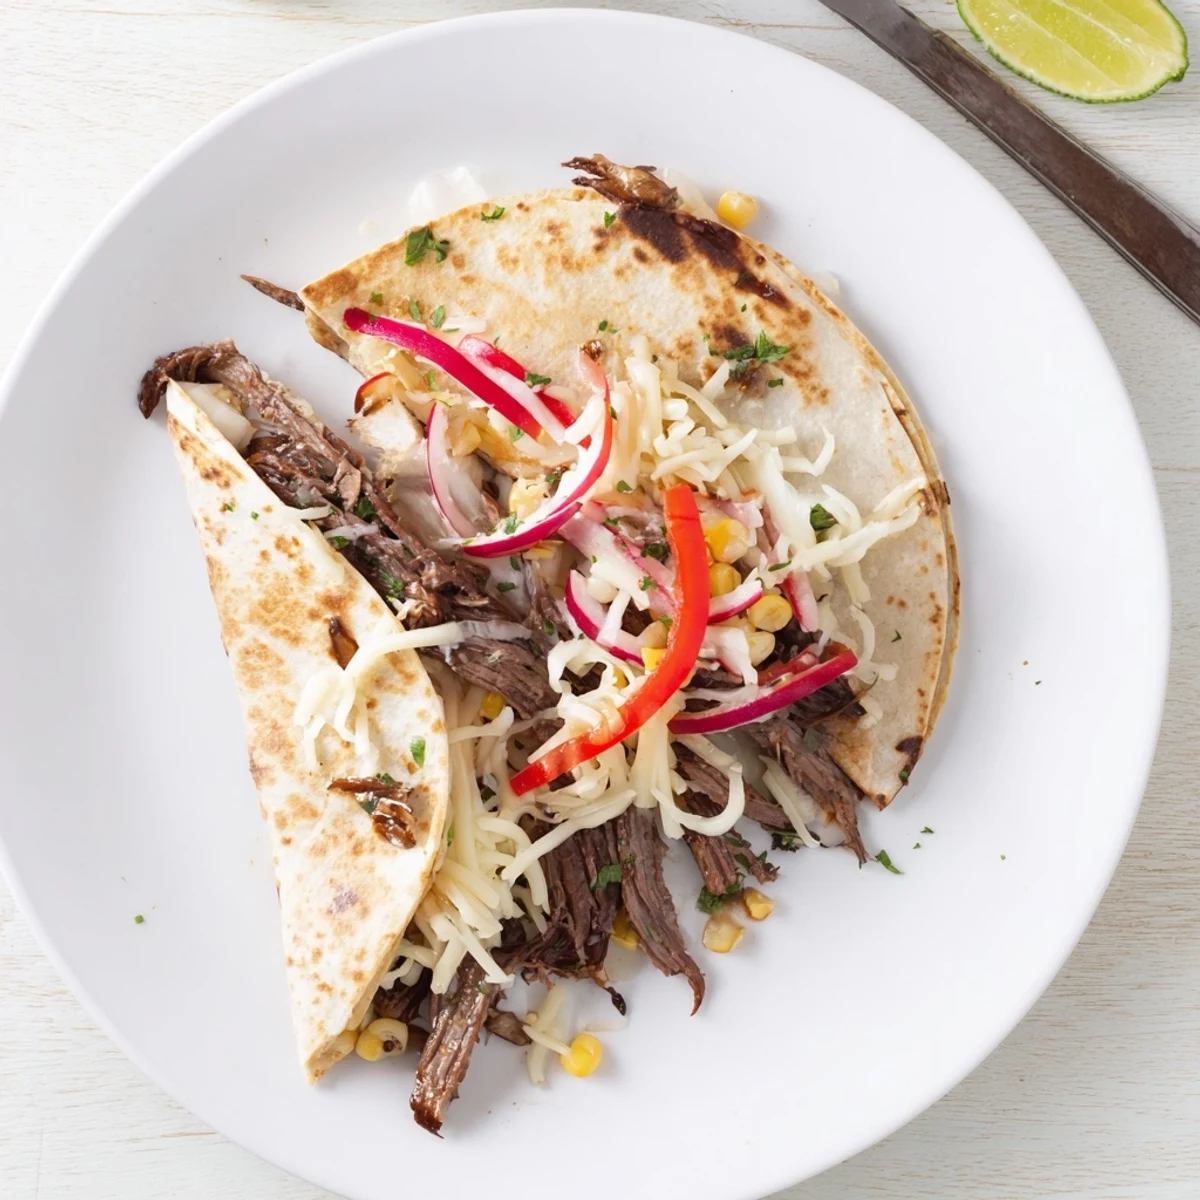
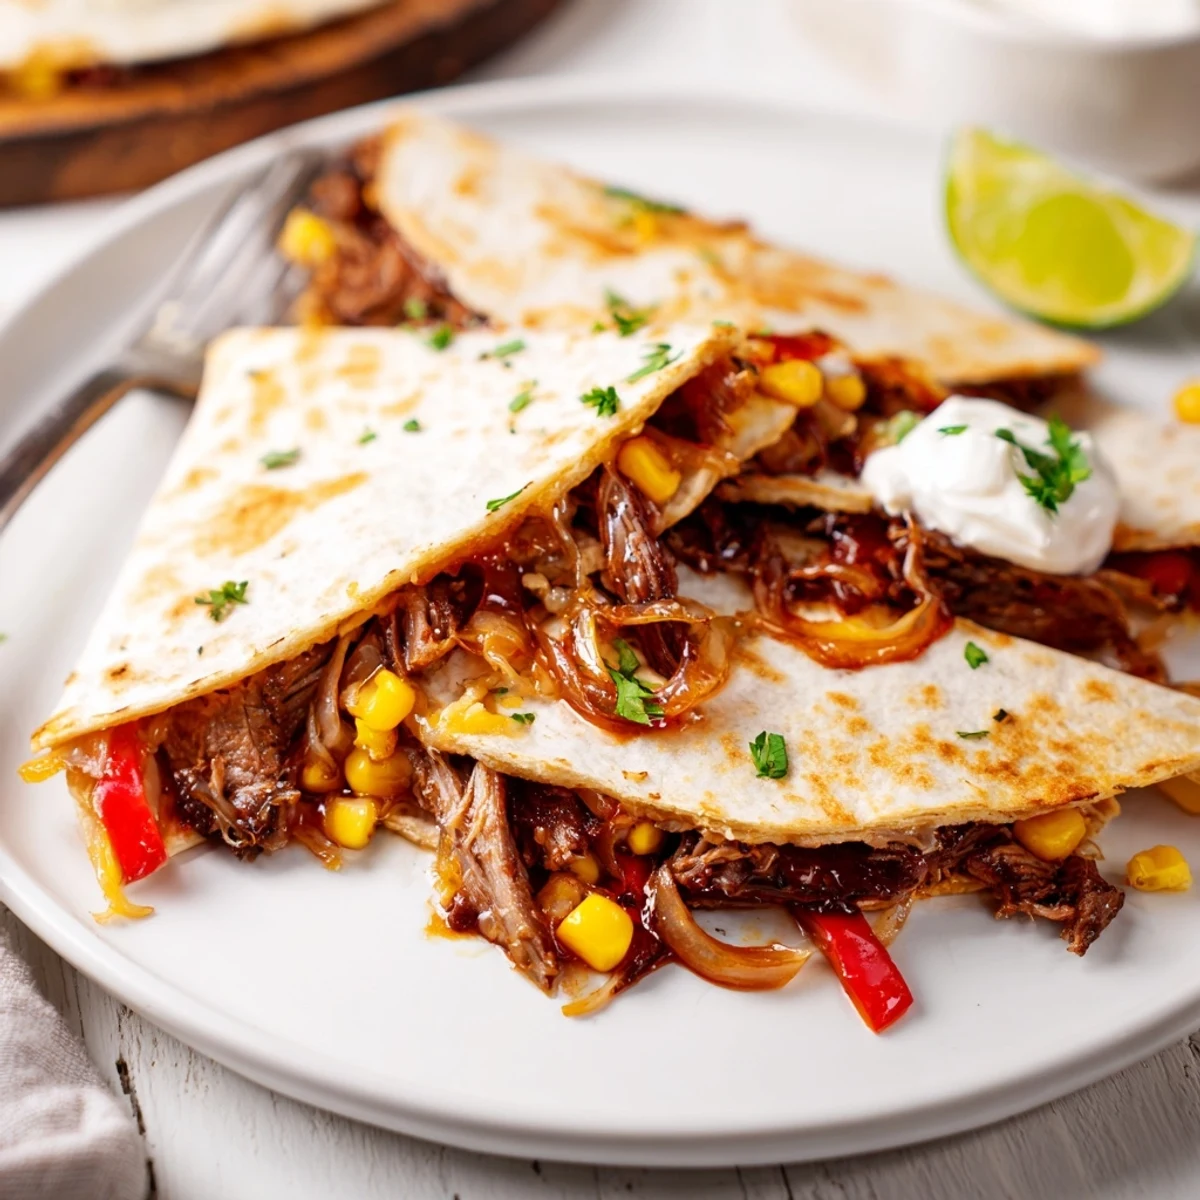
 In about 40 minutes, sear thinly sliced flank or sirloin with smoked paprika, brown sugar and soy until caramelized. Add garlic and red onion and cook until softened. Assemble tortillas with mozzarella, cheddar, the beef mixture, bell pepper and corn, then pan-fry 2–3 minutes per side until golden and cheese melts. Serve warm with lime, cilantro and sour cream; try pineapple for extra sweetness or jalapeños for heat. Reheat in a skillet to keep crisp edges.
The exhaust fan was broken the afternoon these quesadillas were born, and every neighbor within three apartments knew something incredible was happening in my kitchen. That sweet soy glaze hitting a hot skillet produces an aroma that should probably be bottled and sold. I had stumbled home from a rainy farmer's market with a flank steak and zero plan beyond feed yourself before you get hangry. Forty minutes later I was standing at the counter eating wedges straight off the cutting board because plates felt like an unnecessary delay.
I made these for my roommate's birthday once because she specifically requested no cake, just real food. We sat on the living room floor with a platter of wedges, a bowl of sour cream, and a Netflix series neither of us remember because we were too busy eating. She looked at me mid bite and said this is the kind of food that makes you close your eyes. That comment has stayed with me longer than any culinary compliment I have ever received.
Ingredients
- Flank steak or sirloin (300 g, thinly sliced): Freeze the steak for about twenty minutes before slicing and it cuts like butter against the grain.
- Olive oil (1 tbsp): Just enough to get a good sear going without overwhelming the other flavors.
- Salt (1/2 tsp), black pepper (1/4 tsp), and smoked paprika (1/2 tsp): The smoked paprika is what gives you that subtle campfire undertone that makes people ask what is in this.
- Brown sugar or honey (2 tbsp): This is the secret weapon that caramelizes into the beef and makes the whole thing sing.
- Soy sauce (2 tbsp): Adds depth and saltiness that balances the sweetness perfectly.
- Garlic (2 cloves, minced): Fresh only please, the jarred stuff loses too much punch for this recipe.
- Red onion (1/2, thinly sliced): Cooks down into sweet jammy strands that disappear into the filling.
- Red bell pepper (1, thinly sliced): Brings color and a fresh crunch that cuts through the richness.
- Sweet corn kernels (1/2 cup, drained): Little bursts of sweetness that echo the brown sugar in the beef.
- Shredded mozzarella (1 cup) and shredded cheddar (1 cup): The mozzarella stretches and the cheddar brings sharpness so you need both for the full effect.
- Large flour tortillas (4): Go for the biggest ones you can find because you will want to load these up.
- Sour cream, fresh cilantro, and lime wedges (optional for serving): The lime squeeze at the end is not optional in my house, it brightens everything up dramatically.
Instructions
- Season and sear the beef:
- Heat the olive oil in a large skillet over medium high heat until it shimmers. Toss in the sliced beef with salt, pepper, and smoked paprika, and let it sear undisturbed for about two minutes so those edges get some color.
- Build the glaze:
- Pour in the brown sugar, soy sauce, minced garlic, and red onion slices, then stir everything together. Keep cooking for four to five minutes until the sauce thickens and clings to the beef like a sticky shell and the onions go soft and translucent.
- Prep your skillet for assembly:
- Wipe that skillet clean with a paper towel because any leftover sugar will burn on the next step. Set it back on medium heat and lay down your first tortilla flat.
- Load and fold:
- Sprinkle half the mozzarella and cheddar over one half of the tortilla, then pile on a quarter of the beef mixture, some bell pepper strips, and corn. Fold the empty half over like a book and press down gently so it holds together.
- Cook until golden:
- Let it sit for two to three minutes per side without fussing with it too much, pressing lightly with your spatula. You want a deep golden crust and cheese that oozes out just slightly at the edges.
- Repeat and serve:
- Move the finished quesadilla to a cutting board and repeat with the remaining tortillas and filling. Slice into wedges and serve warm with sour cream, cilantro, and lime wedges on the side.
 Save to Pinterest
 There is something deeply satisfying about food you eat with your hands that still feels like a real meal and not just a snack. These quesadillas live in that perfect space between casual and intentional.
Making It Your Own
Once you nail the basic technique the variations are endless. I have tossed in pineapple tidbits when I wanted a tropical vibe and diced jalapeños when I needed a wake up call. Sliced mushrooms or shredded chicken work beautifully if beef is not your thing, just keep the glaze ratio the same and you are set.
The Right Tools Make It Easier
A large skillet with a flat bottom is really the only nonnegotiable here because you need even contact across the whole tortilla. A sharp knife and a sturdy cutting board matter more than you think for getting those thin beef slices and neat wedges at the end. A wide spatula gives you confidence when flipping without everything tumbling out.
A Few Things Worth Remembering
Cooking is forgiving as long as you pay attention to your heat levels and trust your eyes over the timer. These quesadillas are done when they look done, golden and crisp with cheese bubbling at the seams.
- Slice the beef as thin as you possibly can because thick pieces refuse to stay put inside the fold.
- Keep the heat at medium once you start cooking the assembled quesadillas, any higher and the tortilla burns before the cheese melts.
- Serve them immediately because the magic fades fast and cold quesadillas are a sad experience nobody deserves.
 Save to Pinterest
 Make these for someone you like and watch their face after the first bite. That is really the whole point of cooking, sharing something good with people who matter to you.
Recipe Questions & Answers
- → How do I keep tortillas crisp and avoid sogginess?
-
Use a hot, lightly oiled skillet and cook each side until golden, pressing gently to seal. Drain excess juices from the beef and avoid overloading with fillings; thinly slice vegetables so they release less moisture.
- → Which cut of beef works best for quick cooking?
-
Thinly sliced flank steak or sirloin sears quickly and stays tender. Slice against the grain for best texture. If using a thicker cut, pound or slice thinly to reduce cooking time.
- → What cheeses give the best melt and flavor?
-
A blend of mozzarella for stretch and cheddar for flavor creates a great melt and balance. For more kick, swap some cheddar for pepper jack or add a handful of Oaxaca for creaminess.
- → How can I balance the sweet and savory elements?
-
Start with a small amount of brown sugar or honey when seasoning the beef and taste as you go. Bright elements like lime and cilantro at serving cut the sweetness and lift the overall flavor.
- → Can I prepare components ahead of time?
-
Yes. Cook the beef filling and store it refrigerated for 2–3 days. Assemble and pan-fry just before serving for best texture. You can freeze cooked filling up to one month; defrost and reheat before assembling.
- → Best way to reheat without losing crispness?
-
Reheat in a dry skillet over medium heat for a few minutes per side to restore the golden crust and melt the cheese. Avoid microwaving, which makes tortillas limp.
